
I own thousands of dollars in Sony camera equipment, but here’s the truth: I shoot most of my photos with my iPhone 17 Pro Max. Not because it’s better than my professional gear, but because it’s always with me. As a professional photographer, I’ve learned that the best camera truly is the one you have with you—and for me, that’s almost always my iPhone.
This matters because it’s about stewardship. It’s about using what’s already in your hands instead of constantly chasing the next piece of gear. If you’ve been upgrading to the latest iPhone but still feel frustrated with your image quality, this guide will help you unlock the full potential of the camera you already own.
Essential Camera Settings
Let’s start with the foundation: your camera settings. Open your Settings app and search for “Camera” at the bottom. Here’s how I configure my iPhone for the best possible image quality.
Camera Control Button
If you have an iPhone 16 Pro, Pro Max, or any iPhone 17 model, you have the camera control button on the side of your phone. I keep this set to launch the camera with a single press. It’s the fastest way to get shooting without swiping or opening apps—just press the button and you’re ready to capture the moment.
Photographic Styles
Apple offers various photographic styles that automatically apply filters to your images. I keep mine set to Standard with no automatic filters applied. Why? Because I’m going to edit all my photos later in Lightroom, and I want to start with the most neutral image possible. Filters can limit your editing flexibility, so I prefer to add my own look during post-processing.
Video Recording Settings
For video, I shoot at 4K 60 frames per second. I used to use 30fps, but I found myself wanting to slow down footage occasionally, and 30fps doesn’t provide enough frames for smooth slow motion. The 60fps setting gives me flexibility while maintaining that crisp, sharp look that works well for social media content like Instagram Stories and Reels.
I keep these additional video settings enabled:
- Enhanced stabilization: On (default)
- HDR video: On
- Auto frames per second: Off (I want consistency—all my clips at 60fps, not some at 30 and others at 60)
For slow motion, I use 4K at 120fps. This gives me the highest resolution with excellent slow-motion capability. If I need even slower motion, I can drop to 1080p at 240fps, but 4K 120 handles most situations.
Audio Settings
I keep audio set to Spatial because it captures sound from both behind the camera (where I’m standing) and in front of it (my subject). This creates more natural-sounding audio than mono or basic stereo. Living in Montana where wind is common, I also enable wind noise reduction.
Image Format Settings
This is crucial for getting the most out of your photos. Here’s my setup:
Capture Format: High Efficiency (HEIC)
Photo Mode: 24 megapixels
Pro Raw and Resolution Control: On
Pro RAW Format: JPEG XL (lossy)
The JPEG XL lossy format provides excellent quality with smaller file sizes. I’ve compared lossy to lossless, and I honestly can’t see the difference in my final images, but the file sizes are substantially smaller.
Video Capture: Apple ProRes enabled
ProRes Encoding: Log (not HDR)
I shoot in Log because I often combine iPhone footage with clips from drones, action cameras, or my Sony cameras. Log gives me a flat color profile that’s much easier to match across different cameras. If you’re only shooting on your iPhone and want footage that’s more ready to post without color grading, stick with HDR.
Preserve Settings
Turn on all preserve settings options (except Action Mode). This ensures that every time you open the camera app, all your custom settings are maintained. You won’t have to readjust your preferences every single time you shoot.
Display Options
I enable the grid and level to help with composition and keeping horizons straight. However, I turn off “View Outside the Frame.” That feature shows you what’s beyond your frame edges, which I find distracting. I’d rather see exactly what the camera is capturing—nothing more, nothing less. This prevents mistakes when shooting quickly, where you might think something is in frame when it’s actually just outside it.
In-Camera Shooting Techniques
Now let’s look at how I use the camera app itself. I don’t keep the camera app on my home screen because I don’t need to—the camera control button launches it instantly.
RAW vs. HEIC
In the top left corner of the camera app, you’ll see your image format. I shoot in RAW at 48 megapixels when I know I’m going to edit the photo. RAW files contain the maximum amount of image data, giving me incredible flexibility to adjust colors, contrast, highlights, and shadows during editing.
However, RAW files are large and require special software to open. For quick snapshots that don’t need editing—like documentation photos or images I’m texting to someone—I switch to HEIC. HEIC files are compressed, have smaller file sizes, work across all platforms, and can be easily shared via email or text.
Flash Settings
I keep flash turned off almost always. Phone flash creates harsh, unflattering light, especially on people. It’s better than complete darkness, but if I need additional light, I’d rather use a separate flashlight held at a different angle than having the flash blast someone from the same direction as the lens.
Live Photos
I keep Live Photos off. If I want video, I’ll shoot actual video. The little video clips that Live Photos creates just take up storage space without adding value for me.
Exposure Compensation: The Secret Weapon
Here’s one of the most important techniques: exposure compensation. Tap the arrow icon to access advanced options, then adjust the exposure slider.
I typically set my exposure to negative 0.3 or negative 0.7. Here’s why: The iPhone tends to slightly overexpose images, especially outdoors with bright skies. Overexposed areas lose detail that can’t be recovered in editing.
My rule of thumb: It’s always better to underexpose slightly than overexpose. You can bring details back from darker areas, but you can’t recover blown-out highlights or sky details. I use -0.7 outside and -0.3 inside.
I apply this same technique when shooting video. Because video files have less editing flexibility than RAW photos, getting the exposure right in-camera is even more critical. Watch your subject’s skin tones and the sky—if they’re blown out, dial down the exposure.
Choosing the Right Lens
The iPhone 17 Pro and Pro Max have three 48-megapixel cameras: ultra-wide (0.5x), wide (1x), and telephoto (up to 5x). While they’re all the same resolution, they don’t all produce the same quality.
The 1x wide camera is the sharpest and highest quality. The 0.5x ultra-wide creates stunning images but isn’t as sharp. The telephoto options are convenient but also not quite as crisp as the 1x.
My approach: Use the 1x camera whenever possible. Even if that means physically moving closer to or farther from my subject. The quality difference is worth the extra steps. Use the other lenses only when you absolutely need the wider field of view or can’t physically get closer.
Macro Mode
When shooting close-up, a macro icon appears. I often turn this off. The iPhone doesn’t have a true macro lens—it’s a software simulation that changes the focus behavior. I find it inconsistent, sometimes focusing on the wrong point even when I tap to specify where I want focus. Try it for yourself, but don’t assume it’s always the best option for close-up shots.
Editing in Adobe Lightroom
RAW image capability transformed how I use my iPhone. Before Apple added RAW support, I rarely used my iPhone for serious photography because the compressed JPEG images had limited editing flexibility. Now with RAW files, I can process iPhone images just like photos from my professional cameras.
I edit all my iPhone photos in Adobe Lightroom. I’ve used Lightroom for years with my Sony cameras, and the workflow is identical. The beauty of Lightroom is that when I edit an image on my iPhone, it automatically syncs to my iPad and Mac. If I want more screen space or precision control, I can continue editing on a larger device. For retouching or removing objects, the desktop version of Lightroom is definitely better than working on the phone.
Real Editing Examples
Let me show you how I transform average iPhone photos into images that make people think they came from a professional camera.
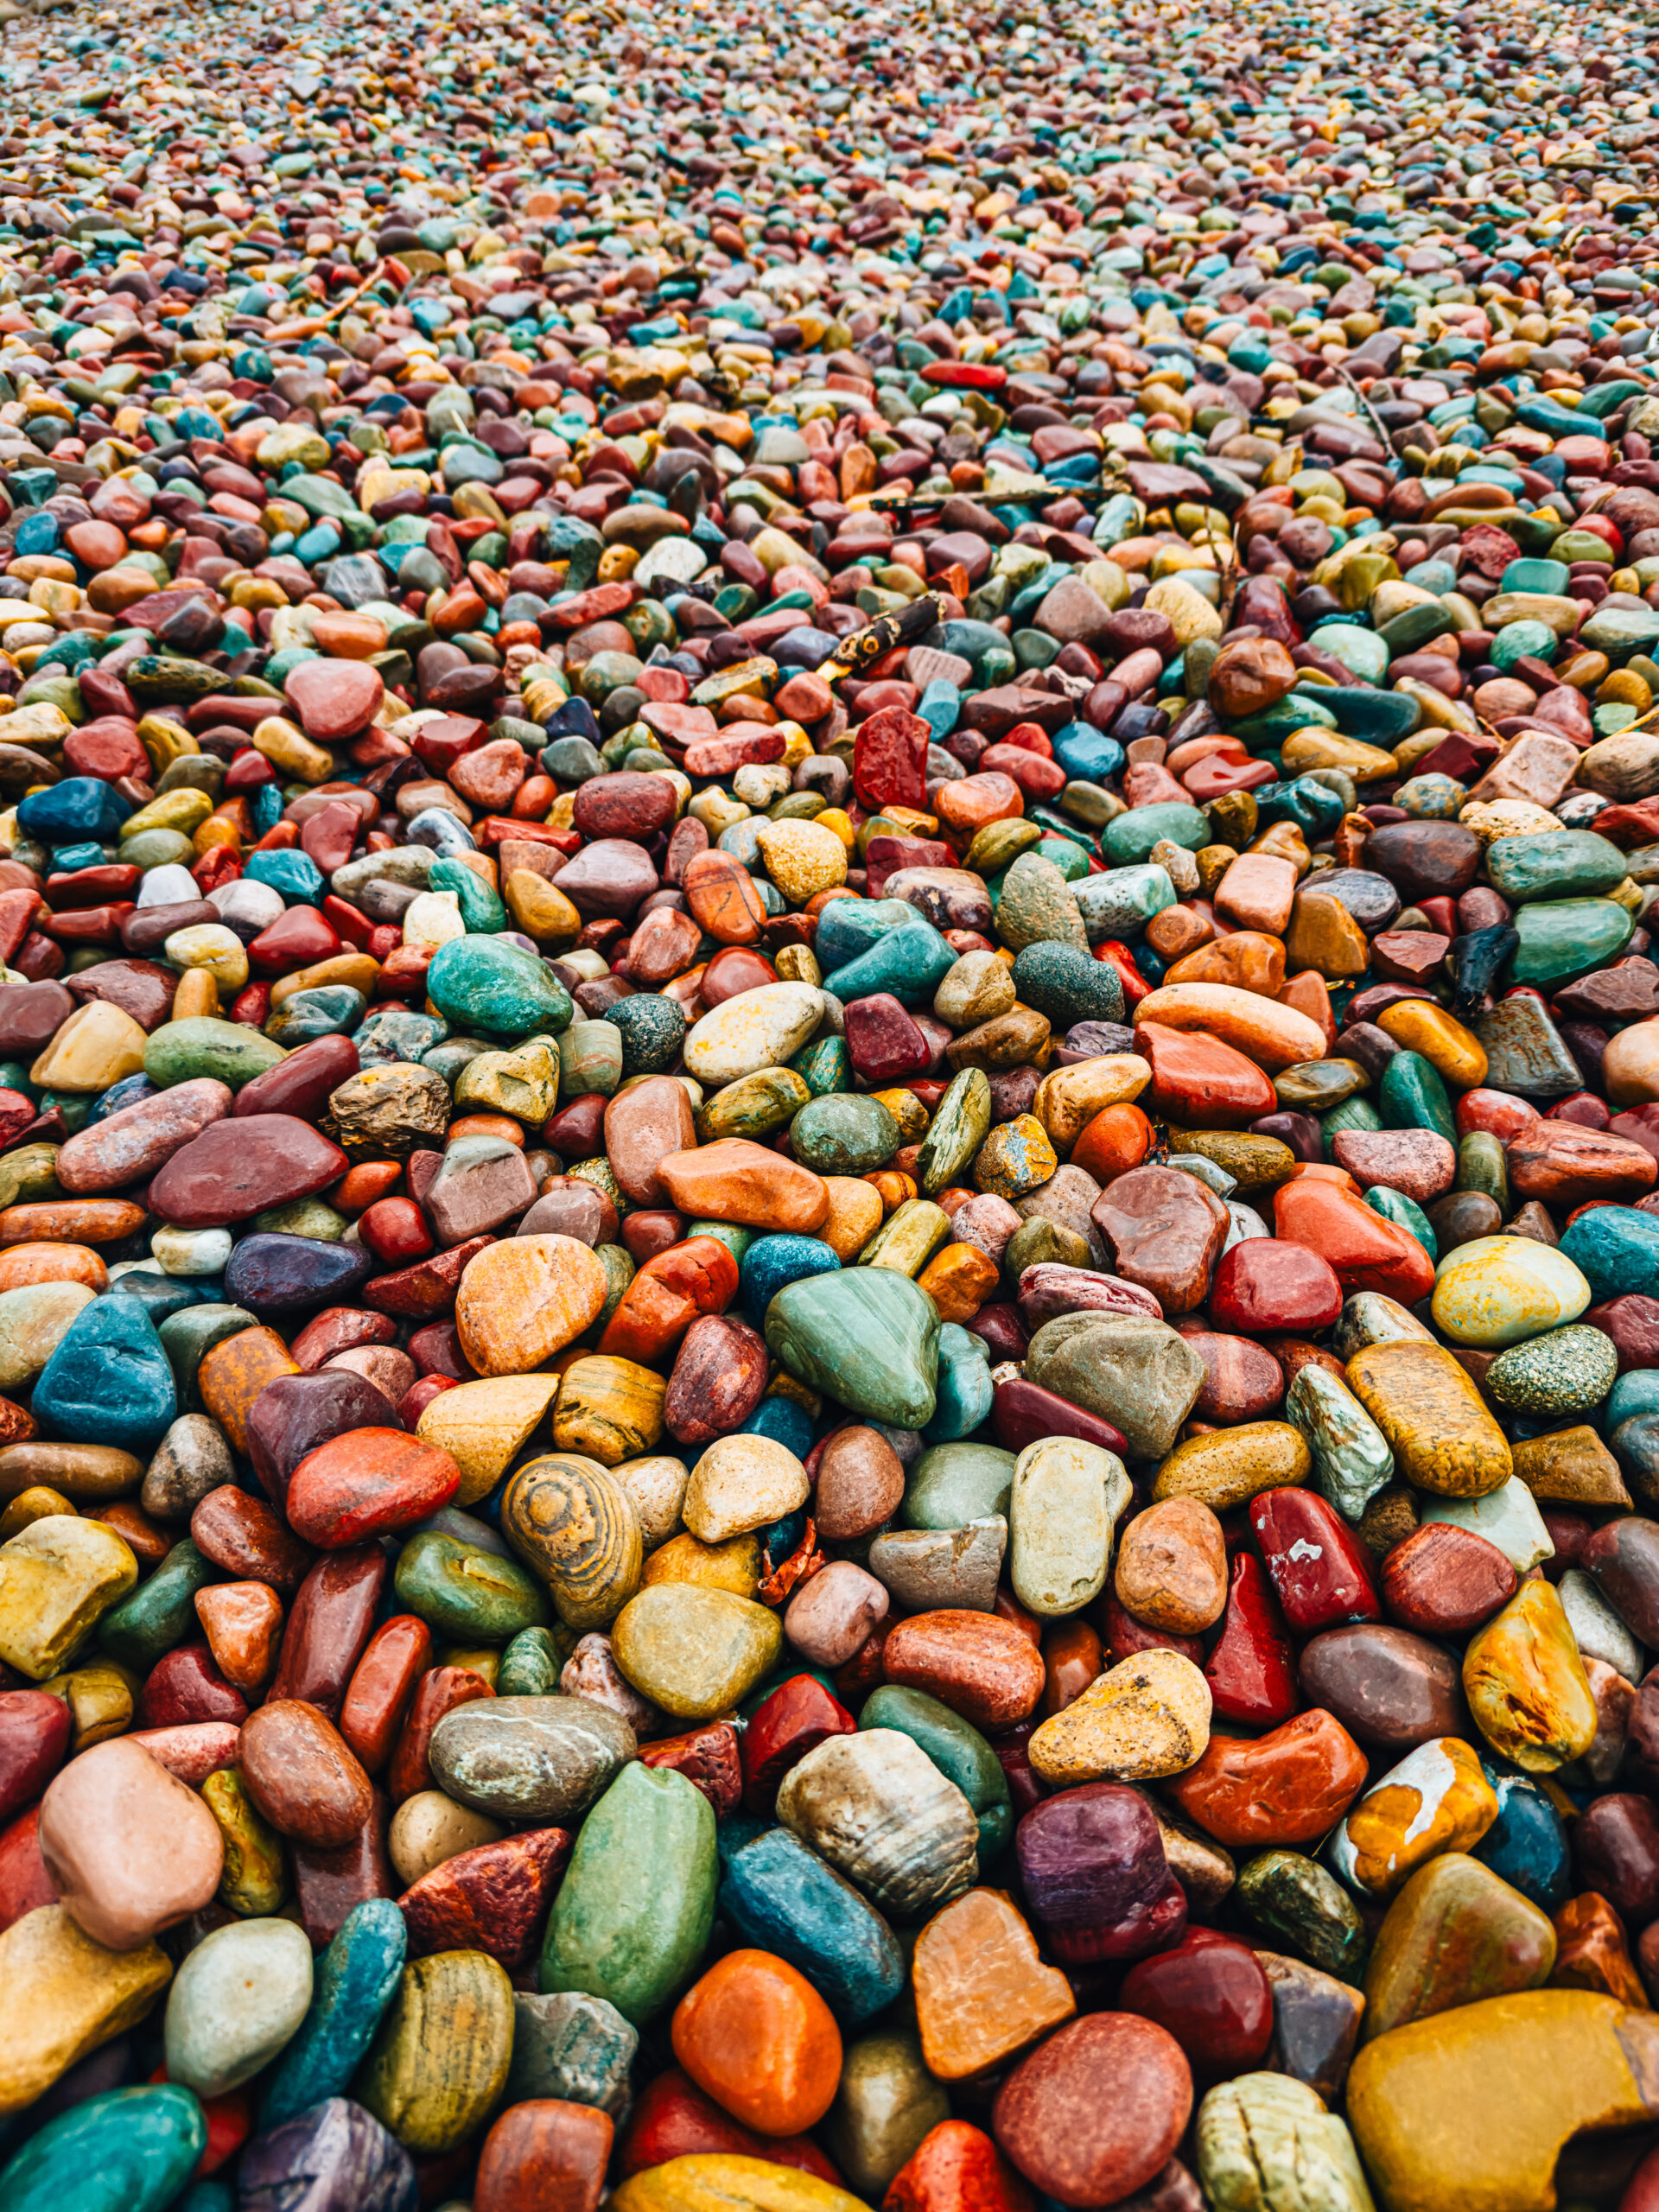
Example 1: Colorful Montana Rocks
I shot these beautifully colored rocks in Montana. Before editing, the image was fine—decent exposure, good composition—but nothing special. By applying one of my custom presets and adjusting the colors, the rocks transformed into vibrant, eye-catching subjects.
The key was increasing both vibrance and saturation significantly, then fine-tuning individual color channels to make specific hues pop. This is an extreme example—I wouldn’t apply this level of color enhancement to most images. But for scenes where color is the star, don’t be afraid to push the sliders.

Example 2: Montana Landscape
This image featured mountains, an ominous sky, vibrant green fields, and a dirt road. The original was flat and lifeless. After applying my “Rattlesnake” preset (I name all my presets after Montana peaks and locations), the image gained dramatic depth.
I made minor adjustments to the shadows slider to brighten the darker areas slightly, and that was it. Before and after, the difference was striking—all with minimal work.
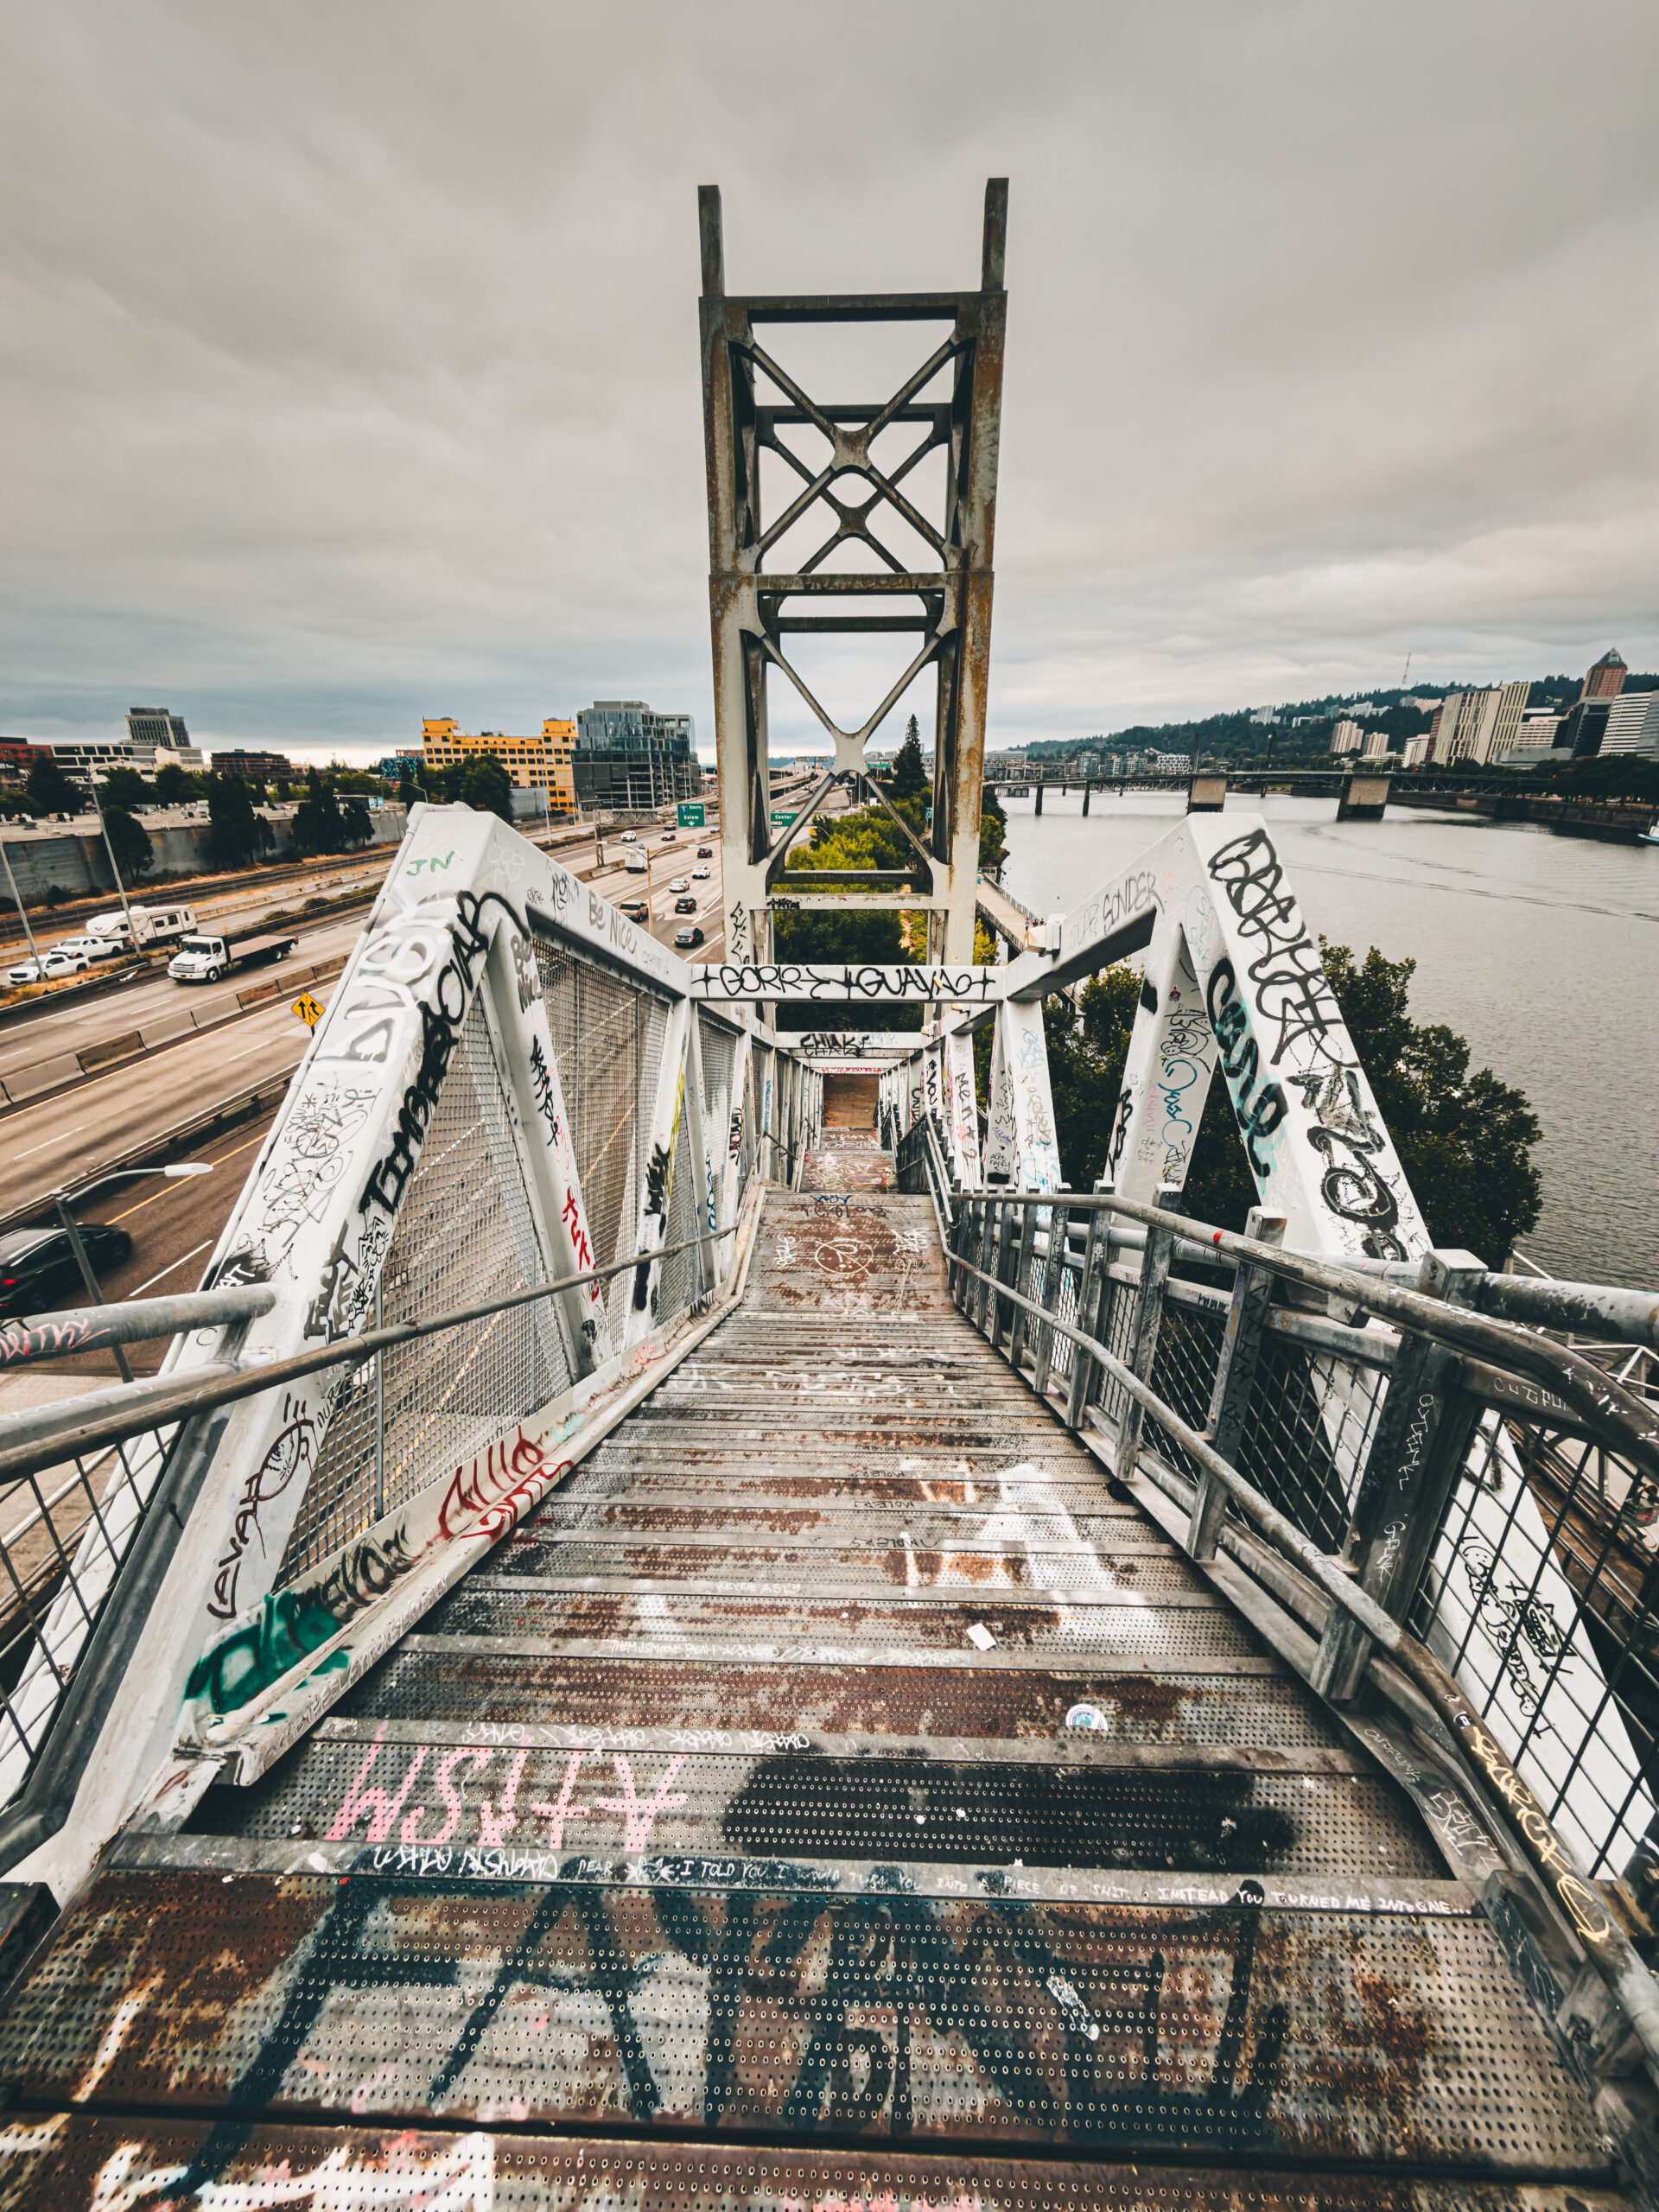
Example 3: Portland Stairway
While running in Portland, I captured these stairs with strong leading lines. I wanted a grittier, more urban feel. The original was well-composed but too bright and lacked edge.
I applied my “Lone Pine” preset, which adds significant contrast. Then I pushed the whites slider up, pulled the blacks slider down, brought back some shadows, and reduced highlights to add definition to the sky and prevent the white painted areas from blowing out.
These adjustments gave the image that gritty, contrasty look I was after. The highlights slider is particularly useful—it brings back detail in bright skies and prevents white surfaces from becoming featureless blobs of light.
Creating Your Own Presets
Once you find editing adjustments you like, save them as a preset. Tap the settings icon in Lightroom and choose “Create Preset.” Give it a memorable name (mine are all named after Montana mountains), and you’ll build your own library of looks that you can apply with a single tap.
Start with a preset, then fine-tune the specific image. This workflow is much faster than starting from scratch every time.
Learn To Edit in Adobe Lightroom
Transform your photos into stunning images with the same Lightroom workflow I’ve refined over a decade as a professional photographer.
This course reveals my complete editing process—from import to export—showing you exactly which tools matter and which ones to ignore. No overwhelming complexity, just the practical workflow I use daily on client work and personal projects.
BONUS: Includes my Lightroom Preset Pack “MTN Moments.”
Get the course today: https://courses.jeradhill.com/courses/lightroom-landscape-photo-editing-for-ipad/
Key Editing Principles
- Start with good exposure: Use exposure compensation in-camera to get as close as possible to your desired look before editing.
- Adjust contrast carefully: The combination of whites, blacks, highlights, and shadows gives you precise control over contrast and tonal range.
- Be intentional with color: Vibrance and saturation are powerful tools, but use them appropriately for your subject. Landscape rocks can handle extreme color; portraits need subtlety.
- Don’t overprocess: Your goal is to enhance what the camera captured and bring the image closer to what you saw with your eyes—or create an intentional artistic look. Either way, be purposeful.
- Compare before and after: Tap and hold on your image in Lightroom to see the original. This helps you judge whether your edits are enhancing or overpowering the image.
The Deeper Why: Stewardship Over Excess
Here’s what this all comes back to: using the tools you already have. You own an iPhone—probably a very capable one. Instead of waiting until you can afford a “real” camera or convincing yourself you need the latest gear, learn to use what’s already in your pocket.
By understanding your camera settings, mastering exposure compensation, and learning to edit RAW files in Lightroom, you can create images that stand out and reflect your unique vision. Most people won’t even realize they were shot on a phone.
This is about faithfulness with what’s in your hands. It’s about stewardship—maximizing the potential of existing tools rather than constantly chasing the next upgrade. Your iPhone has excellent cameras and powerful software. The question isn’t whether it’s capable of creating great images. The question is whether you’re willing to learn how to use it well.
So get out there and shoot. Experiment with these settings. Push some sliders in Lightroom. Develop your own style. Create images that matter to you, using the camera that’s always with you.
I write more about using technology intentionally and stewarding our tools well on my Substack newsletter. If you want to go deeper on topics like this, that’s where the real conversation happens.

You must be logged in to post a comment.